Why, I have been asked, do I not use a paddle when warping with multiple ends?
The question came as a comment to this post – and the shortest possible answer is: but I did – only the "paddle" took the form of a reed.
One longer answer is: because I often use several colours/nuances, and rarely want a 1/1 lease because that would prevent a "random" colour placement.
Examples of "random" colour threadings (and the results) are:
On the occasions I do want a "perfect" colour order and the ends are of similar value (and thus can be difficult to see when threading) I do make a 1/1 lease – but as these colour orders often do not repeat, I haven’t found a way to make the paddle work: once the ends are in the paddle, they have their set place... Also, my favourite method for making colour transitions is based on Pascal’s triangle, which means I need to change the number of ends I warp with all the time. The system is described in an article on my website – here.
Some examples:
Detail from side panel:
Another one:
Detail, approximately bottom left corner:
I have seldom had problems with bigger leases, probably because my loom(s) are quite long, and because I seldom use very fine threads. (Most of what I weave is cotton 30/2 and coarser, and my favourite wool is approx 10000 m/kg, or something over 5000 ypp.) Maybe I would find out the need for a 1/1 lease if I ever could get my hands on some real angel hair... :-)
Showing posts with label warping. Show all posts
13/12/2012
22/07/2012
The double warp
The double layer scarf that caused the buttonhole elastic experiment would (preferrably) have to be warped with eight ends, as I did not want to bother with wding spools for such an odd colourway. As I have shown before, warping with four ends is no problem - but how to get eight ends separated by just fingers?
Answer: use a reed:
All ends cleanly separated, I then took them two at a time through my fingers, and wound each section on the warping mill, using an eight-end cross..
As I felt adventurous, I just grasped the cross flat between fingers, and dropped it into the tension-box raddle, and tensioned the bout "by feel".
Some of the sections do look a little wonky, but I'm now nearing the end of the 12m warp without problems: I think I can pronounce the experiment successful.
The first scarf on it's way to the cloth beam:
and the second at the sandpaper beam:
Answer: use a reed:
All ends cleanly separated, I then took them two at a time through my fingers, and wound each section on the warping mill, using an eight-end cross..
As I felt adventurous, I just grasped the cross flat between fingers, and dropped it into the tension-box raddle, and tensioned the bout "by feel".
Some of the sections do look a little wonky, but I'm now nearing the end of the 12m warp without problems: I think I can pronounce the experiment successful.
The first scarf on it's way to the cloth beam:
and the second at the sandpaper beam:
03/02/2011
Alternatives to warp sticks
An alternative to warp sticks: flanged sticks!
This picture I stole from Tallbacka väv - because she sells them. (on her website, click on "Övriga vävprodukter..." She calls them bomhakar. And I am sure she will answer questions in English, if need be :-)
This kind of "stick" will never bend, whatever happens... and you only need one set. Per loom, that is. As they are made of steel, I guess that postage will be a problem for many parts of the world - .
When Laura visited some years ago, she managed to stow them in her luggage - see hers used here.
My table loom did not come with sticks, and I use it seldom enough not to want to buy any. I have tried both corrugated cardboard and bubble plastic, having seen both materials recommended. In my experience, neither works... the cardboard collapses and becomes flat, the bubble plastic is better, but only marginally. So I use a newspaper or two (no, not "paper from newspapers", but the whole thing). I put it in with the folded edge first.
This picture I stole from Tallbacka väv - because she sells them. (on her website, click on "Övriga vävprodukter..." She calls them bomhakar. And I am sure she will answer questions in English, if need be :-)
This kind of "stick" will never bend, whatever happens... and you only need one set. Per loom, that is. As they are made of steel, I guess that postage will be a problem for many parts of the world - .
When Laura visited some years ago, she managed to stow them in her luggage - see hers used here.
My table loom did not come with sticks, and I use it seldom enough not to want to buy any. I have tried both corrugated cardboard and bubble plastic, having seen both materials recommended. In my experience, neither works... the cardboard collapses and becomes flat, the bubble plastic is better, but only marginally. So I use a newspaper or two (no, not "paper from newspapers", but the whole thing). I put it in with the folded edge first.
30/01/2011
Meanwhile: while using the valet
For the first many years of my weaving life, I used warping sticks exactly as I was taught: for the first round, place the sticks so they nearly touch each other. * Proceed with making 3 turns, 4:th turn put warping sticks, but not quite as many. * Repeat from * to * until done.
I noticed that, for narrow warps, I had issues with the edge tension more often than not. When I analyzed the situation, I found the reason:
as the first part of the warp was beamed, with sticks, the sticks would bend slightly.
Here, I use three cords from warp beam to "apron bar". (Never use more fastenings than necessary, or the tie-on bars can warp!)
When I used warp sticks from the very beginning, they would look like this (exaggerated, of course):
The pressure/tension on the warp would cause the sticks to bend slightly - and that would often cause different tension on edges and middle.
So - nowadays, I divide the warp (to get away from the middle cord), and wind on enough that the warp is more even with the height of the beamed cords, as seen above.
When I think the surface is even, I introduce the warp sticks. (I would never beam a warp longer than 3-4 meters totally without sticks!)
To make it easier to handle the sticks (I'm doing this by myself, remember), I use button-hole elastic to make a... "mat"?. I make these "mats" appproximately as long as the circumference of the warp beam - and I use them like I was taught: 3 turns, 1 turn with sticks, 3 turns, 1 turn with sticks... - until done.
When weaving, I try to do "the same" on the cloth beam - ie no sticks until "level". This usually means I'm using (say) two pieces of heavy paper/cardboard plus one piece of lighter paper for the protection of the beginning of the cloth. When I think the cloth beam is about level, I put another "mat" of sticks - and that's it.
As you may remember, on this double warp I had two sets of lease sticks , each suspended from it's own "hanger".
The warps were offset a bit, and the blue warp (or, at least, the lease of the blue warp) is under the white.
Now, when threading (from the right), obviously I start with the white warp - there is a single layer of white to the right. I pick the white end "randomly" from the 4-end cross. (Quotation marks, because I try to get them in order - if I see a twist, I try to avoid it.)
When I start threading the double layers, I pick one end from each cross, threading end-on-end. I have never had any problem from the fact that the crosses do not correspond - . (And yes, I leave the lease sticks in, still in their holders - but I make sure they are well back towards the back beam.)
Sorry, no pictures from the threading - but here is an article about how to derive a double-layer weave where the layers change places.
I noticed that, for narrow warps, I had issues with the edge tension more often than not. When I analyzed the situation, I found the reason:
as the first part of the warp was beamed, with sticks, the sticks would bend slightly.
Here, I use three cords from warp beam to "apron bar". (Never use more fastenings than necessary, or the tie-on bars can warp!)
When I used warp sticks from the very beginning, they would look like this (exaggerated, of course):
The pressure/tension on the warp would cause the sticks to bend slightly - and that would often cause different tension on edges and middle.
So - nowadays, I divide the warp (to get away from the middle cord), and wind on enough that the warp is more even with the height of the beamed cords, as seen above.
When I think the surface is even, I introduce the warp sticks. (I would never beam a warp longer than 3-4 meters totally without sticks!)
To make it easier to handle the sticks (I'm doing this by myself, remember), I use button-hole elastic to make a... "mat"?. I make these "mats" appproximately as long as the circumference of the warp beam - and I use them like I was taught: 3 turns, 1 turn with sticks, 3 turns, 1 turn with sticks... - until done.
When weaving, I try to do "the same" on the cloth beam - ie no sticks until "level". This usually means I'm using (say) two pieces of heavy paper/cardboard plus one piece of lighter paper for the protection of the beginning of the cloth. When I think the cloth beam is about level, I put another "mat" of sticks - and that's it.
As you may remember, on this double warp I had two sets of lease sticks , each suspended from it's own "hanger".
The warps were offset a bit, and the blue warp (or, at least, the lease of the blue warp) is under the white.
Now, when threading (from the right), obviously I start with the white warp - there is a single layer of white to the right. I pick the white end "randomly" from the 4-end cross. (Quotation marks, because I try to get them in order - if I see a twist, I try to avoid it.)
When I start threading the double layers, I pick one end from each cross, threading end-on-end. I have never had any problem from the fact that the crosses do not correspond - . (And yes, I leave the lease sticks in, still in their holders - but I make sure they are well back towards the back beam.)
Sorry, no pictures from the threading - but here is an article about how to derive a double-layer weave where the layers change places.
29/01/2011
Prequel: before using the valet
... there must be a warp.
This is the making of the blue-white warp beamed here.
The warp consists of two: one blue warp, one white, to be beamed together. Both are cotton of various grists - 16/2, 24/2 and 30/2. The blue warp has (if I remember) three slightly different nuances.
This warp was woven into a message shawl.
Starting with the white, I put a "tube holder" under a row of hooks on the wall (the picture is a montage - the hooks sit at about 120 cm height).
I use 4 ends, mostly because I have 4 "slots" between my fingers... holding them like this:
This way, the yarns cannot twist around each other, which makes beaming (and, later, weaving) easier. I wind with only one cross, and I do the cross with all four ends. Like this:
After both warps are wound and chained, I take them to the table, take out the reed I will use for rough-sleying, put something heavy on the warp, mark where I will start the sleying:
The sley-hook is my favourite (read more here), and all my reeds has their midpoint somehow marked (here with a piece of wool).
I start picking out the loops from the cross.
Each loop has 8 ends - four "coming" and 4 "going".
For 8 ends per cm, I chose a 40/10 reed (standard Swedish reed-numbering - 40 dents per 10 cm). For the rough-sleying, that means one loop (8 ends) every fourth dent:
I make sure that the stick goes in the same loop as the nearest lease stick, to make transferring the cross easy:
Why, I have been asked, do I transfer the cross at this stage? Why not do it after beaming? I have two answers: 1. 'cos this is what I was taught and (more important) 2. 'cos I tried leaving it until after beaming, and had a lot more tangles. With the cross behind the reed, the reed will place the loops in order for the lease sticks for further separation and ordering.
Had this been the only warp, the rough-sleying would be done, and the warp been taken to the loom (and the valet), but, in this case, there is a white warp, too.
It is to be offset a bit, so I first determine where it should begin:
As this warp, too, shall be sett at 8 ends/cm, I use the second of the empty dents.
When the white warp is sleyed and it's cross transferred, too, both warps are combined on an extra stick:
The extra stick now hold the loops in order, and the whole thing can be transferred to the loom. I just shove the heddles to the side(s), so the warp can pass between them. (When having a wide warp, I take off the shafts - easy to do with this free-hanging type.)
The reed is put in it's normal place, the loops are transferred from the extra stick to the back "apron bar"(?), the two pairs of lease sticks are placed in their supporting hangers, the varp is routed under the breast beam and over the valet's roller:
This is the making of the blue-white warp beamed here.
The warp consists of two: one blue warp, one white, to be beamed together. Both are cotton of various grists - 16/2, 24/2 and 30/2. The blue warp has (if I remember) three slightly different nuances.
This warp was woven into a message shawl.
Starting with the white, I put a "tube holder" under a row of hooks on the wall (the picture is a montage - the hooks sit at about 120 cm height).
I use 4 ends, mostly because I have 4 "slots" between my fingers... holding them like this:
This way, the yarns cannot twist around each other, which makes beaming (and, later, weaving) easier. I wind with only one cross, and I do the cross with all four ends. Like this:
After both warps are wound and chained, I take them to the table, take out the reed I will use for rough-sleying, put something heavy on the warp, mark where I will start the sleying:
The sley-hook is my favourite (read more here), and all my reeds has their midpoint somehow marked (here with a piece of wool).
I start picking out the loops from the cross.
Each loop has 8 ends - four "coming" and 4 "going".
For 8 ends per cm, I chose a 40/10 reed (standard Swedish reed-numbering - 40 dents per 10 cm). For the rough-sleying, that means one loop (8 ends) every fourth dent:
I make sure that the stick goes in the same loop as the nearest lease stick, to make transferring the cross easy:
Why, I have been asked, do I transfer the cross at this stage? Why not do it after beaming? I have two answers: 1. 'cos this is what I was taught and (more important) 2. 'cos I tried leaving it until after beaming, and had a lot more tangles. With the cross behind the reed, the reed will place the loops in order for the lease sticks for further separation and ordering.
Had this been the only warp, the rough-sleying would be done, and the warp been taken to the loom (and the valet), but, in this case, there is a white warp, too.
It is to be offset a bit, so I first determine where it should begin:
As this warp, too, shall be sett at 8 ends/cm, I use the second of the empty dents.
When the white warp is sleyed and it's cross transferred, too, both warps are combined on an extra stick:
The extra stick now hold the loops in order, and the whole thing can be transferred to the loom. I just shove the heddles to the side(s), so the warp can pass between them. (When having a wide warp, I take off the shafts - easy to do with this free-hanging type.)
The reed is put in it's normal place, the loops are transferred from the extra stick to the back "apron bar"(?), the two pairs of lease sticks are placed in their supporting hangers, the varp is routed under the breast beam and over the valet's roller:
Labels:
cultural differences,
tips-and-tricks,
tools,
warping,
warping valet
26/01/2011
Warping valet
When I first learned to weave, there was one method (and one only) to get the warp onto the loom (onto the warp beam, that is): using helpers.
Here is an illustration from my Cyrus (Manual of Swedish handweaving) - mine is printed in 1980, but I'd say the picture is a little older...
As you can see, it takes 4 persons to get a medium-width warp beamed - 3 if it is narrow, and more if it is wider.
This method has historic roots. It is described in many books (among them Grenander-Nyberg, Lanthemmens vävstolar). - often it it said that there were just a few "experts" in every village, to be called on every time one wanted to start a new warp. Most older descriptions tell about how "everybody" came together to help "setting up the loom" - it took several helpers to get the warp beamed, it took two to thread/sley. (There were also several "magic sayings" - should one accidentally come upon a "setting up the loom", any part of it, one should hurry to take a few very high steps, saying "SO high shed, SO high shed", for instance. From Tillhagen, Vävskrock.)
Some years later the guild was collecting tips-and-tricks - and it turned out that more-or-less everybody had their own specials for beaming without help. (One of my favourites was to stretch the warp in front of the loom and place a vacuum on top of it...)
Then came the commercially produced "pådragningsknekt" - literally "valet (helper) for winding on". It is produced for sale by AK:s snickeri, and looks like this:
They recommned stretching the warp from the beam, through the reed (rough-sleyed; raddles are all but unknown in Sweden), over the breast beam, under the foot-rest, up over the valet and down to the floor again. Weights are attached and let ride up to the top of of the valet, then lowered.
I decided to make my own - after all, the commercial product consists of three pieces... Mine is made from 2 pieces of 2-by-2 (inches), approx 2 meters high. There is a hole near the top, where I insert two pieces of steel rod. Between them I hang a sturdy aluminium tube.
The lumbers are placed inside the loom frame; one rod is inserted; tube is held in place and the second rod is inserted. Took about 15 minutes to build (including fetching the drill); takes about 3 minutes to put in place...
As my loom is not as "nice" (I mean smooth), I have modified the warp route - I let the warp go under the breast beam and directly up and over the valet.
For the last bit of warp, I re-route the warp to go over the breast beam instead. Takes many moves of the weight for the last meter!
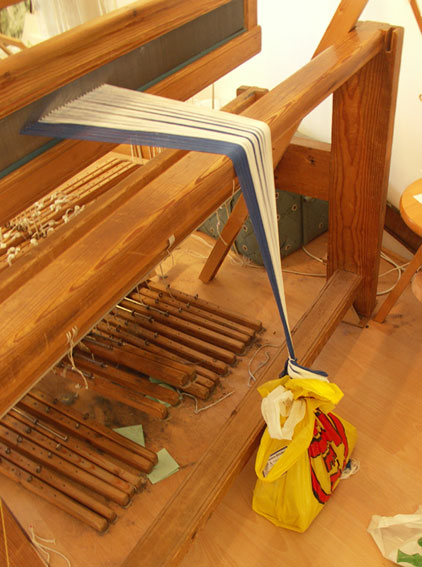
For weight, I use bricks in (as you can see...) ordinary plastic bags.
The advantage of this kind of easily disassembled warping valet is that it is portable, flexible... I can even use it for the AVL, if I want to. In that case, I lean the lumbers out over the track (or what's it called, where the tension box rides?). I tie the (rough-sleyed) reed to that same track. The beaming has to be done with more care
(ie more slowly), because the reed is not as stable as when it sits in the beater - but it works.
Perhaps I should warn you: aluminium will stain fabric. I've put paper on my tube, which also has another life: it acts as strengthening for the (too weak) knee beam.
Here is an illustration from my Cyrus (Manual of Swedish handweaving) - mine is printed in 1980, but I'd say the picture is a little older...
As you can see, it takes 4 persons to get a medium-width warp beamed - 3 if it is narrow, and more if it is wider.
This method has historic roots. It is described in many books (among them Grenander-Nyberg, Lanthemmens vävstolar). - often it it said that there were just a few "experts" in every village, to be called on every time one wanted to start a new warp. Most older descriptions tell about how "everybody" came together to help "setting up the loom" - it took several helpers to get the warp beamed, it took two to thread/sley. (There were also several "magic sayings" - should one accidentally come upon a "setting up the loom", any part of it, one should hurry to take a few very high steps, saying "SO high shed, SO high shed", for instance. From Tillhagen, Vävskrock.)
Some years later the guild was collecting tips-and-tricks - and it turned out that more-or-less everybody had their own specials for beaming without help. (One of my favourites was to stretch the warp in front of the loom and place a vacuum on top of it...)
Then came the commercially produced "pådragningsknekt" - literally "valet (helper) for winding on". It is produced for sale by AK:s snickeri, and looks like this:
They recommned stretching the warp from the beam, through the reed (rough-sleyed; raddles are all but unknown in Sweden), over the breast beam, under the foot-rest, up over the valet and down to the floor again. Weights are attached and let ride up to the top of of the valet, then lowered.
I decided to make my own - after all, the commercial product consists of three pieces... Mine is made from 2 pieces of 2-by-2 (inches), approx 2 meters high. There is a hole near the top, where I insert two pieces of steel rod. Between them I hang a sturdy aluminium tube.
The lumbers are placed inside the loom frame; one rod is inserted; tube is held in place and the second rod is inserted. Took about 15 minutes to build (including fetching the drill); takes about 3 minutes to put in place...
As my loom is not as "nice" (I mean smooth), I have modified the warp route - I let the warp go under the breast beam and directly up and over the valet.
For the last bit of warp, I re-route the warp to go over the breast beam instead. Takes many moves of the weight for the last meter!
For weight, I use bricks in (as you can see...) ordinary plastic bags.
The advantage of this kind of easily disassembled warping valet is that it is portable, flexible... I can even use it for the AVL, if I want to. In that case, I lean the lumbers out over the track (or what's it called, where the tension box rides?). I tie the (rough-sleyed) reed to that same track. The beaming has to be done with more care
(ie more slowly), because the reed is not as stable as when it sits in the beater - but it works.
Perhaps I should warn you: aluminium will stain fabric. I've put paper on my tube, which also has another life: it acts as strengthening for the (too weak) knee beam.
Labels:
cultural differences,
tips-and-tricks,
tools,
warping,
warping valet
Subscribe to:
Posts (Atom)


