Showing posts with label mangling. Show all posts
23/04/2015
Now what?
The fan fabric is done: inspected (several mistakes... some mis-sleying, some treadling mistakes, some must-have-been-a-bad-shed, one end not caught for long stretches), some repairs (only broken ends, the mistakes were too difficult); washed; mangled.
(I'm hoping I can get at least one shirt without glaring mistakes - perhaps it was A Good Thing I used such a busy/uneven pattern?)
So what have I learned? I think the most important thing is not to sley three per dent, because 1) it is very difficult to get it correct and 2) all too often the three ends did not separate when crowded.
I would have used a temple, had I but planned better: just five centimetres wider, and my biggest temple would have worked. Or: just 10 cms narrower, and one of the shorter temples would have been enough.
I also have learned to look better at the yarns when doing fairly dense setts - some of the spools had twisted-together ends, when they might have been knotted for better strength. I might have seen the knots, but the twists just separated.
Perhaps also it would have been better with fewer shafts? The more shafts, the more difficult to optimize the sheds. Here I had 8 shafts, and after too much fiddling I decided the top of the sheds were "good enough"... wrong decision, obviously.
It was "interesting" to mangle a fan fabric. As you have seen, there are small bumps in the cloth when weaving. They are not all gone when washed, and even knowing the trick of only smoothing to the sides (never along the warp) when rolling, some bumps wanted to stay.
No matter how tight one tries to make the roll, after a couple of passes it has loosened - partly because of the back-and-forth motion of the mangle, partly because the cloth flattens. Because of the persistent bumps, I re-rolled several more times than I normally do. The result is ok, though.
(But I "cheated" and pressed after mangling, also to help with the after-drying...)
Some pics:
Now to decide what kind of shirt to make, to go with the sort-of-diagonal-ish pattern.
One of the obvious choices is a not-really-shaped top, but there are five metres of fabric...
Perhaps some kind of kimono (or do I mean bat-wing?) "over-shirt", perhaps? I'm not sure about set-in sleeves with a fabric like this - thinking that probably they have to be matched in some way.
For now, the fabric sits on a roll on top of the fabric shelves.
Labels:
cold mangling,
fan reed,
mangling,
temples,
twill
20/03/2015
The full-width fan sample
As reported, the warp is now threaded, sleyed and tied-on.
After the "preliminary" (ie half-sloppy) tie-up, and some trial weaving, it was time to fine-tune the tie-up.
( - weaving with a fan reed really requires a maximized shed - when the reed is in the lowest position, one wants the top of the shed to be as high as possible, and vice versa.)
As I have been traipsing the countryside looking at spinning wheels, it took me until today to do the actual work, but today was the day. After fiddling with the lamm height, and the treadle height, and the lifting of shaft 2 on treadle 4, and...
This is the sampling of the "quality" (linen or cotton weft?), but not quite the sampling of the weft colour.
I intended to use some light-grey linen, but it seems I have dreamed up that colour. I tried a light blue linen, but it isn't wonderful.
Wove some bands in cotton 16/2, using "weftovers" in colours I don't consider using, but they will work for the "quality check".
Picked out some other possible linens:
Tried the pink linen, but it shows Very Pink - decided I wanted lower contrast and found a light yellow linen.
Cut off, machine-washed, a short time in the dryer, some pressing to flatten and (last) mangled, this is how it looks now:
It isn't yet completely dry, so I will have to wait to evaluate the weft material choices.
27/11/2014
More on patents and mangles
Jean noticed what should have been obvious to me, too: the patent drawing is different from the "real thing". This made me read the patent text more carefully - and it turns out that the machine in the drawing probably was never built. It is couched in some complicated language, but essentially the text says "this is one possible construction".
Last, in the text, are three patent claims (is that right? "patent wishes"?) - 1) a tabletop mangle with a lower roller lifted with help of a two-armed swiveling lever and a spring, 2) same as 1, with the addition that the two-armed lever is angled and 3) same as 1, with the addition that the arm which connects with the spring is longer than the other arm.
Here are a couple of detail pictures:
How the spring is mounted:
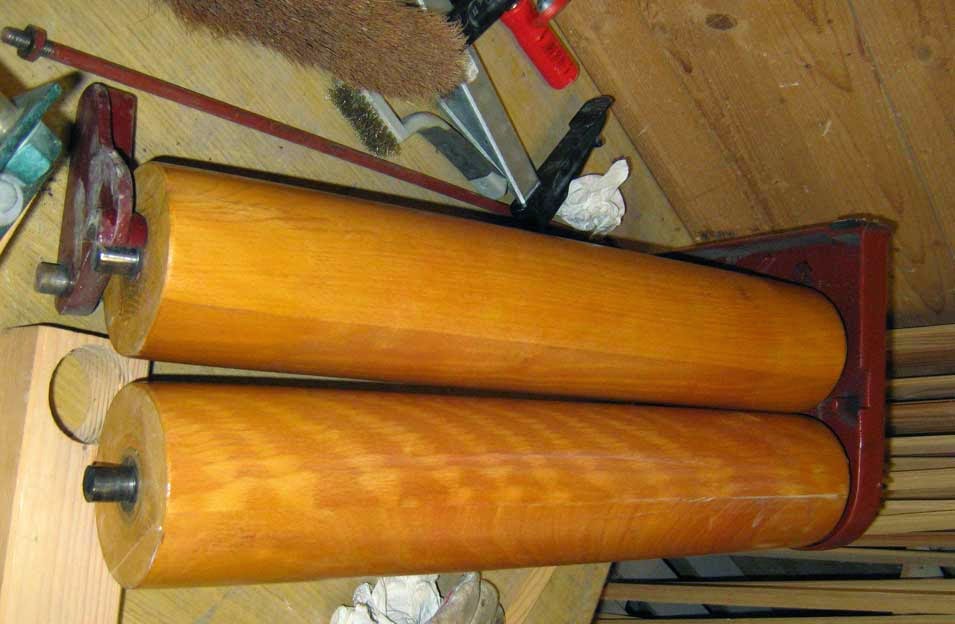
The rollers (and the "swing", or two-armed swiveling lever) exposed:
(yes, the picture is turned - this is the way the rollers go when the mangle is operational)
And now we all can see that the actual construction is even more different from the patent... And, yes, it is the right patent, because the patent number is written on the side piece:
As for "apron" or no apron - I don't know. Before the mechanical mangle, there was the roller and the "plank":
(for many fantastic carved boards - they were often very decorated - go here)
Anyway, from what I have read, these were used either "as is" or with a special "mangle sheet": roll the cloth (with or without the protector) as tightly as possible onto the roller; grab the board, lean hard on the board and roll in the same direction as the cloth had gone on; when you reach the end, slide the roller back towards you; repeat.
Next came the box mangle - like this or this (or, for the scary pictures, this!). From what I understand, one of the ideas with the mangle sheet was that you could load several smaller pieces in one go - but I think that it also helps with the "sheen".
All the older "small" mangles with the big spring on top I have seen have been without apron. Come to think of it, mine may be one of very few having the apron.
All modern mangles have it, though.
As for adding one: I think the important bit is getting the roller smooth again - no ridge, no screw heads...
Last, in the text, are three patent claims (is that right? "patent wishes"?) - 1) a tabletop mangle with a lower roller lifted with help of a two-armed swiveling lever and a spring, 2) same as 1, with the addition that the two-armed lever is angled and 3) same as 1, with the addition that the arm which connects with the spring is longer than the other arm.
Here are a couple of detail pictures:
How the spring is mounted:
The rollers (and the "swing", or two-armed swiveling lever) exposed:
(yes, the picture is turned - this is the way the rollers go when the mangle is operational)
And now we all can see that the actual construction is even more different from the patent... And, yes, it is the right patent, because the patent number is written on the side piece:
As for "apron" or no apron - I don't know. Before the mechanical mangle, there was the roller and the "plank":
(for many fantastic carved boards - they were often very decorated - go here)
Anyway, from what I have read, these were used either "as is" or with a special "mangle sheet": roll the cloth (with or without the protector) as tightly as possible onto the roller; grab the board, lean hard on the board and roll in the same direction as the cloth had gone on; when you reach the end, slide the roller back towards you; repeat.
Next came the box mangle - like this or this (or, for the scary pictures, this!). From what I understand, one of the ideas with the mangle sheet was that you could load several smaller pieces in one go - but I think that it also helps with the "sheen".
All the older "small" mangles with the big spring on top I have seen have been without apron. Come to think of it, mine may be one of very few having the apron.
All modern mangles have it, though.
As for adding one: I think the important bit is getting the roller smooth again - no ridge, no screw heads...
22/11/2014
Yet another mangle
this one compact, and patented.
The patent is interesting, as it is granted in 1937, but valid from '34. It contains a drawing, a very enlightening one (as you can see):
It was a bit fiddly to get apart - and I couldn't get the right-hand piece off. Or, well, I decided I did not need to get it all apart. (The cog wheels are very securely mounted)
(So why take off the left-hand piece at all? 'Cos the rollers needed some work, that's why.)
The spring is, well, a standard one:
There are some "golden" details:
The rollers, after some sanding and lacquer:
Now all that remained was to put it together again. Should be a piece of cake, yes?
Well.
It really wanted to have four pieces in four holes at the same time - the back connexion rod, the upper roller, the bottom "swing" for the bottom roller and the front "spring-holder" all connect to the left side, plus the bottom roller needed to be in its cradle on top of the "swing".
Everything would really have been easier if I could have had the spring in place, too, but I only have two hands... After much fiddling (and some new words) I managed to get the spring in place, later. (This type of spring isn't one one just "wrestles" in place.)
Before putting the table in place:
(When do I have 'nuf mangles, you ask? Well, I like to rescue them - and on occasion I do re-home them. This one has just moved to Denmark, and I might consider selling this one, too - weighs about 25 kgs, so pick-up is a good idea...)
23/09/2014
The innards of one table-top mangle
(Sorry, the workshop is too narrow, and the assembled mangle is too heavy to move for just a "beauty shot")
This one is different from the one pictured here, in that it doesn't have a protector sheet. Instead, this one is made to just send the mangle goods through - if you want harder mangling, you will have to send it through again. (And, possibly again, and again...)
It came to me in need of some tinkering. Here are the pieces, "top-down":
When all the detachable pieces are taken out, what remains is the frame and the table (in two pieces, hinged to make it shallower. Under the front table, there is a "manual" and an admonition to store it safely:
On the right-hand side there is a gear of sorts, to make the bottom roller go faster than one wants to crank. (I had it off to clean it, but mounted it before I thought to take pictures)
Next, the bottom roller (the one with the gear and crank at the right-hand side) is dropped into place. The gears mesh with a bit of jiggling:
Then the top roller goes in, on top of the bottom one. The gears at the left-hand side mesh.
Two smallish pieces, one on each side, to press down on the top roller, go under the heavy cross piece. The spring just sits on top of the cross piece.
To complete the assembling, the top piece is put into place. It is fastened with 4 screws, two on each side.
(The whole shebang has five screws only - one for the bottom gear, and 4 to hold the top.)
To control the pressure, you use the top screw.
A detail shot of the "manual" (click to make bigger):
An attempt at translation:
Manual
Grease the wheel screw an all bearings. Turn the wheel screw to the right, to make the rollers press hard against each other.
The clothes should be folded with seams, buttons, monograms [embroidered, my note] to the inside. Let the rollers take the clothes over the whole width. The clothes should not be let to go around the rollers. The mangling ought to be done over the whole width of the rollers, that is not on one side only. Dents in the rollers that can occur because of seams, buttons etc will even out over time and will not impede the good [quality, working?] of the mangle.
When mangling is done, turn the wheel screw to the left.
Ystad [town is south Sweden] Foundry & Mechanical Workshop [ltd]
These old mangles are slightly simpler than a spinning wheel - and only marginally more complex than a traditional (Swe) loom (mechanically, that is). And they work as well...
04/10/2013
"Not much to write home about"
is a Swedish saying.
I lost interest in the fan project, at least in its present incarnation, and turned it into a bigger sample. This is now properly wet finished and mangled. This colour turned out to be extremely difficult to photograph - or maybe I just don't understand how to handle the new-to-me picture-manipulating software.
I used three nuances from two manufacturers for the warp. This time all warp yarns are cotton 16/2, but they have different twists. For the "contrast" part I used a 16/2 with higher twist (thus apparently thinner), and for the "same" part I used one of the softer (thus apparently fatter) warp yarns. The "fatter" yarn gave a slightly wider result - something I had not anticipated.
On the whole, I think I like the "same" part better - that is, the use of one block only in the treadling. But maybe the contrasting weft was better...
I also pictured it hanging in the window - maybe this is the best use for fan fabric?
Now, what to do with the rest of the warp?
Hmmm... the warp is the same I used for the "leaves" scarves - maybe I could combine the two ideas... except I would go mad with such a treadling sequence. Or I would go mad trying to use the fan reed in the AVL. Maybe not a good idea, after all.
I lost interest in the fan project, at least in its present incarnation, and turned it into a bigger sample. This is now properly wet finished and mangled. This colour turned out to be extremely difficult to photograph - or maybe I just don't understand how to handle the new-to-me picture-manipulating software.
I used three nuances from two manufacturers for the warp. This time all warp yarns are cotton 16/2, but they have different twists. For the "contrast" part I used a 16/2 with higher twist (thus apparently thinner), and for the "same" part I used one of the softer (thus apparently fatter) warp yarns. The "fatter" yarn gave a slightly wider result - something I had not anticipated.
On the whole, I think I like the "same" part better - that is, the use of one block only in the treadling. But maybe the contrasting weft was better...
I also pictured it hanging in the window - maybe this is the best use for fan fabric?
Now, what to do with the rest of the warp?
Hmmm... the warp is the same I used for the "leaves" scarves - maybe I could combine the two ideas... except I would go mad with such a treadling sequence. Or I would go mad trying to use the fan reed in the AVL. Maybe not a good idea, after all.
04/07/2013
Mangled linens
And just because I managed to capture the sheen of mangled linens (in the last post), I'll dedicate a whole post to just them:
The picture is turned to make it as big as possible - click to make it even bigger!
And yes, they are different - I often like to make "families": the warp stripes are fixed (of course), but the weft stripes are varied - one placemat has even-sized stripes, one is "tromp-as-writ" until the size was right, one has just two sizes of stripes and so on.
The picture is turned to make it as big as possible - click to make it even bigger!
And yes, they are different - I often like to make "families": the warp stripes are fixed (of course), but the weft stripes are varied - one placemat has even-sized stripes, one is "tromp-as-writ" until the size was right, one has just two sizes of stripes and so on.
Labels:
cold mangling,
flax/linen,
mangling,
weave planning
28/04/2013
Another mangle (and some damask)
Today we went to a renowned damask weaver, Elsa Persson.
She had (and used, of course!) a very old mangle, probably as old as the house itself (that was mid-1800 - I did not pay attention....)
The type is basically the same as mine (ie "box mangle"), but hand operated. I did not get a good overview picture, but here is one from a museum site. (This one lacks the top roller, though)
This type was "home-made" (probably by some local furniture maker). The beds (boards) are not stone (as in mine), but wood. The box has an open top, and stones are added for pressure. Originally it was operated by two persons - it has handles at both ends - pushing and pulling the top back and forth. By about 1900 a crank was added (or perhaps the whole windlass - Laura tells me that is what the contraption is called), so now it can be operated by one person.
The rope is tied to one handle, taken round the top roller several turns, and then tied to the other handle.
Here is an overview of the left side:
(I especially like that it is pegged together, just as our looms always are!)
The rope is tied to the nearest handle (not seen), goes over the roller:
To tip it (to get the rollers which hold the cloth in and out), it is just cranked to one extreme, and the box will tip by itself. I tried to get a picture of that, but could not find an angle where the mechanism/function could be seen.
Elsa has found a way to mangle wide fabrics without a fold: she got this sturdy steel tube, rolls the whole cloth around it and puts it in "halfway" - mangles. Takes the tube out, turns it and mangles the other side. The whole width stays on the tube, but only half the width gets mangled per "pass".
- this, of course, requires an "open-sided" mangle - but mine is! Pity it is Sunday, or I would go to the hardware store immediately... :-)
Laura has posted some pictures of both looms and finished pieces, here - so I will only add one more picture:
A detail of a tablecloth depictiong the story of Elsa's home: the house in the middle, some of the farm's animals (and some wildlife, too - deer of several sorts, typical trees and flowers...) on the borders. This was woven with a single-draw loom.
(Click all pictures to biggify)
She had (and used, of course!) a very old mangle, probably as old as the house itself (that was mid-1800 - I did not pay attention....)
The type is basically the same as mine (ie "box mangle"), but hand operated. I did not get a good overview picture, but here is one from a museum site. (This one lacks the top roller, though)
This type was "home-made" (probably by some local furniture maker). The beds (boards) are not stone (as in mine), but wood. The box has an open top, and stones are added for pressure. Originally it was operated by two persons - it has handles at both ends - pushing and pulling the top back and forth. By about 1900 a crank was added (or perhaps the whole windlass - Laura tells me that is what the contraption is called), so now it can be operated by one person.
The rope is tied to one handle, taken round the top roller several turns, and then tied to the other handle.
Here is an overview of the left side:
(I especially like that it is pegged together, just as our looms always are!)
The rope is tied to the nearest handle (not seen), goes over the roller:
To tip it (to get the rollers which hold the cloth in and out), it is just cranked to one extreme, and the box will tip by itself. I tried to get a picture of that, but could not find an angle where the mechanism/function could be seen.
Elsa has found a way to mangle wide fabrics without a fold: she got this sturdy steel tube, rolls the whole cloth around it and puts it in "halfway" - mangles. Takes the tube out, turns it and mangles the other side. The whole width stays on the tube, but only half the width gets mangled per "pass".
- this, of course, requires an "open-sided" mangle - but mine is! Pity it is Sunday, or I would go to the hardware store immediately... :-)
Laura has posted some pictures of both looms and finished pieces, here - so I will only add one more picture:
A detail of a tablecloth depictiong the story of Elsa's home: the house in the middle, some of the farm's animals (and some wildlife, too - deer of several sorts, typical trees and flowers...) on the borders. This was woven with a single-draw loom.
(Click all pictures to biggify)
Labels:
cold mangling,
drawlooms,
mangle types,
mangling
27/04/2013
More mangling
Yesterday I wrote that my mangle is "a biggish affair". I knew I was wrong, but everything is relative, yes? (Mine barely fits into it's "shed", and feels big enough when you are standing beside it...
Today I managed to find some pictures and the history of the biggest mangle I have ever seen.
(Scroll down a little to find the pictures.)
The description is in Swedish. I don't know how much google translate would "mangle" it, so here are a few of the key facts, translated by me:
"
The mangle is probably built in the 19th century and is one of the biggest in the world.
[...]
The box is 8 metres long, 1 meter wide and weighs 20 tons (20 000 kg). [...] The bottom slopes down from the middle outwards - the slope is more pronounced toward the ends, to facilitate the tipping of the box to change rollers.
[...]
Up to 1928 it was driven by horses. [...] It was then electrified
[...]
The linen goods to be mangled consisted of lots of 100 "aln" (about 200 feet) long (1) for towelling, or 12 metres for tablecloths and napkin goods.
[...]
The rollers were made of a special kind of birch*. The goods were mangled two times. A "mangle cloth" (protector sheet) was not used. [...] The goods were re-rolled between the first and the second mangling. When the mangling was done the goods had become "some aln" (2 ft) longer.
[...]
The mangle was used by the (proto-)industry.(2) "
(1) in another text I have found 30-40 metres for the towelling, but that is impressive enough...
(2) as part of the wet finishing. Measuring was done after mangling, and the weavers were paid based on the measured length (from other sources)
From our mangling today, some before-and-after pictures:
Of course, what with the changing light and other circumstances, the pictures are not quite to the same scale and... but, hopefully, you will notice the difference.
What is nice with white-on-white (or, in this case natural-on-natural) is the subtlety of the resulting pattern. Seen from a slightly different angle:
* the rollers of my mangle(s) are beech. Pictures of the small table mangle here.
Today I managed to find some pictures and the history of the biggest mangle I have ever seen.
(Scroll down a little to find the pictures.)
The description is in Swedish. I don't know how much google translate would "mangle" it, so here are a few of the key facts, translated by me:
"
The mangle is probably built in the 19th century and is one of the biggest in the world.
[...]
The box is 8 metres long, 1 meter wide and weighs 20 tons (20 000 kg). [...] The bottom slopes down from the middle outwards - the slope is more pronounced toward the ends, to facilitate the tipping of the box to change rollers.
[...]
Up to 1928 it was driven by horses. [...] It was then electrified
[...]
The linen goods to be mangled consisted of lots of 100 "aln" (about 200 feet) long (1) for towelling, or 12 metres for tablecloths and napkin goods.
[...]
The rollers were made of a special kind of birch*. The goods were mangled two times. A "mangle cloth" (protector sheet) was not used. [...] The goods were re-rolled between the first and the second mangling. When the mangling was done the goods had become "some aln" (2 ft) longer.
[...]
The mangle was used by the (proto-)industry.(2) "
(1) in another text I have found 30-40 metres for the towelling, but that is impressive enough...
(2) as part of the wet finishing. Measuring was done after mangling, and the weavers were paid based on the measured length (from other sources)
From our mangling today, some before-and-after pictures:
Of course, what with the changing light and other circumstances, the pictures are not quite to the same scale and... but, hopefully, you will notice the difference.
What is nice with white-on-white (or, in this case natural-on-natural) is the subtlety of the resulting pattern. Seen from a slightly different angle:
* the rollers of my mangle(s) are beech. Pictures of the small table mangle here.
Labels:
cold mangling,
curiosities,
mangle types,
mangling
26/04/2013
Mangling
Today we have been working on mangling Laura's samples
The mangle itself is a biggish affair. It was made in about 1900 (I bought it from a house built in 1901, and the story was it was "built into the house"... it was, hm, interesting to get it out from the attic.), it weighs a total of 1450 kg and has a working length of some 4 meters. It has an electric motor, but can be cranked by hand. (That takes a certain amount of dedication, though.)
When I grew up, almost every apartment house had a mangle like this in the laundry room, and I was so happy when I found one for sale here in the "boondocks". I hired piano movers for the move, but they nearly refused... at least, it is now on the ground level, in a shed with wide doors, so it was easy to get it in place.
It was not quite as easy to put it together again: that giant flywheel with the gears attached is cast iron, and would not easily come apart. We had to rig various ropes and timbers to get it up where it belongs (and it took a couple of neighbours helping, too. Don't try this at home!).
For those of you wanting to know how to handle such a "monster", here is an article I wrote many years ago.
ETA: and I found an interesting articla about box mangle history here.
The mangle itself is a biggish affair. It was made in about 1900 (I bought it from a house built in 1901, and the story was it was "built into the house"... it was, hm, interesting to get it out from the attic.), it weighs a total of 1450 kg and has a working length of some 4 meters. It has an electric motor, but can be cranked by hand. (That takes a certain amount of dedication, though.)
When I grew up, almost every apartment house had a mangle like this in the laundry room, and I was so happy when I found one for sale here in the "boondocks". I hired piano movers for the move, but they nearly refused... at least, it is now on the ground level, in a shed with wide doors, so it was easy to get it in place.
It was not quite as easy to put it together again: that giant flywheel with the gears attached is cast iron, and would not easily come apart. We had to rig various ropes and timbers to get it up where it belongs (and it took a couple of neighbours helping, too. Don't try this at home!).
For those of you wanting to know how to handle such a "monster", here is an article I wrote many years ago.
ETA: and I found an interesting articla about box mangle history here.
Subscribe to:
Posts (Atom)