02/12/2016

Happy birthday!

Today the world's oldest Freedom of the Press Regulation is 250 years old.

And what's more: it is the Swedish Freedom of the Press law!


Read more at https://frittord250.se/!

This post ought to be labeled as "essentials", but will instead get the label "curiosities".

To make some sort of textile connexion, here are some text messages:

22/09/2016

Double layers and "clean cuts"


Jean's comment on the differences on right and left (or top and bottom) made me do what I have thought to do for a long time: can the differences be avoided?

So I started with my "normal", looking at both sides:


Seeing that both sides are the same (one side clean, the other jagged) made me suspect that it can't be "fixed", as long as one is interested in a reversible result.
By adding (or subtracting) two ends at the jagged side, one can get clean cuts at both sides.


... but the back will then get both sides jagged:


Personal conclusion: until I feel the urge to take the exchanging layers to twill, I will continue to weave two picks per layer, and live with the un-equal sides because of the reversibility of the result.

Others may have other ideas...

13/09/2016

Triple layers - variation for easier weaving


Yesterday I stopped before doing what I always do: rearranging the treadling for easiest actual weaving:

Unless I have very fat yarns in my double (in this case triple) cloth, I try to arrange the treadling so that I can do two picks per shuttle (layer).
It is so much faster to do two picks before having to change shuttles...

(Yes, it shows in the end product:

These are two not quite focussed pictures of double-layer shawls.
They are approximately 2 x life size, and has the ends one-by-one and the picks two-by-two.
The warps are a combination of cottons, 16/2, 20/2, 22/2 and maybe a few 30/2.
The wefts are of course only one quality per shuttle, but I don't remember which grist. The sett was probably somewhere about 10 ends/cm (25 epi).

And no, I haven't tried it for three layers.)

So: here is what I would do before sitting down to actually weave.

First: use the existing tieup, but rearrange the colour sequence.

Next: rearrange the new treadling to straight:

As I weave from bottom to top, and have an overhead beater, this is the treadling I would use, namely start in the bottom layer, working up to the top layer, as seen in the widest section of the warp.
(Yes, on the loom there will be "gaps" where the layers change. I have never seen these gaps after wet finishing - see pictures above.)

Hm.
Remembering one of my doodlings from yesterday (which did not reach publication) - another way of making more-than-two-different narrow stripes - a shift in the warp sequence can accomplish that:

Of course it depends on the actual colours used etc etc, but something to consider, perhaps?

12/09/2016

A challenge? - I always love a challenge...


So, the question was: how to make a three-layer weave, with warp-wise layer changes?
(and preferably on 12 shafts "only")

This is how I approached the problem:

(To all Swedish readers (and Ellen: hi, Ellen!): note that all tieups are for rising shed. This means that the layers/colours will be reversed if the tieup is used "as is" for a CM.)

Started with a three-layer (three independent layers) weave - for plainweave layers, that takes six shafts.
For instance like this:

(To make things clearer in my mind, I threaded the first (turquois) layer on shafts 1-2, the next (purple) on shafts 3-4, the third (red) on shafts 5-6. When the construction is ready, the threading can be rearranged for easier threading.)

I made the top layer turquoise, the middle layer purple, the bottom layer red-orange. The three layers do not interact at any point. (Note that the difference in nuances between warp and weft makes It easy to see that the bottom, red-orange, layer has a correct interlacement, even without using the "back view".)

Now, we wanted a lengthwise (warpwise) layer exchange. I decided the left hand side is a good place. Thus, to start the construction, assume another "block" of the same threading and colour to occur at the left side. Like so (left pic):


The same threading on a new set of shafts (= a new block), with the same colour order. We want to shift the layers, so I let them "cycle": the middle, purple, layer goes on top - the bottom, red, goes in the middle and the top, turquoise, layer has to go to the bottom.

OK, I hear you: how do I do this?
I am using Fiberworks PCW (silver, if that matters).
By clicking in the drawdown, I can get ends/picks to the top (for instance).

Middle pic above: all purple threads, both warp ends and picks, are taken to the top.
Next is to fix the interlacement: right-hand pic above. Note that the interlacement should be a continuation of the purple plainweave in the right-hand (first) three-layer block.


Now to fix the middle layer, the red-orange one. Click all ends and picks so that they are under the purple layer, but on top of the turquoise (left picture below). Fix the interlacement - easy because of the difference between the red and the orange - right-hand picture below.

For the bottom (turquoise) layer, it is easier to use "back view".
As it happens, all turquoise threads are already at the bottom... fix the interlacement, go back to "front" view again:

Unfortunately, all the 12 shafts are now used.
As we want another stripe, we add another block (6 shafts) - now the total is 18.

The same procedure again: make the red-orange layer top, the turquoise will be in the middle and the purple layer will go to the bottom layer:

In the hopes that I had missed something important, I let the software analyse my result - alas, I had not: it really takes 18 shafts to do this.

But...

What if: let one of the layers stay in the same position for two stripes: this will reduce the goal to two blocks. With the three "open" layers on the right-hand side of different widths, and several narrow-ish stripes on the left-hand side... voilà, only 12 shafts. An alternative?

(As I, personally, prefer straight threadings whenever possible, I rearranged it for this final picture, showing both front and back:


(Remember: click pictures to enlargen)

07/09/2016

Dräll pulleys and opposite tie-ups, again


So is it possible to use dräll pulleys for other than two-block "opposite" weaves?

To refresh your memory, here is one illustration from my web page on dräll pulleys, with 6 shafts mounted:


The question came up in another context, and I tried to construct some examples.
Starting with a 2/2 twill - this is one "normal" way to thread and tie it up:

(The red line represents the position of the dräll pulley, the line which makes the mirror for the opposite tieup)
As can be seen, that tieup will not work. Starting from the left, the first column will work. The second will not, as shafts 1 and 4 both go up (in the Swe notation), while shafts 2 and 3 both go down). Third column is "opposite", fourth is not.

So what can be done? We need to do something to both column 2 and 4, trying to get them "opposite". One way is this:

By changing the threading, we have also changed the tieup, which is now compatible with the dräll pulleys: it is now "opposite". (Note that this also prevents a true tabby, as the threading no longer follows the odd-even rule).

Next try, an 8-shaft even tieup (by "even" I mean that all sheds have half of the shafts up, half down, in various combinations - see a discussion on "even" weaves here)


Started with the leftmost column - and got the fourth correct as a bonus.

However much I tried, I could not fix more than 4 columns/treadles.

Maybe I could modify the pattern some, and still like the result? So I marked all the ties that conformed with the rule:

Started to take out/put in ties in the possible positions... this was the best result I could come up with:

Would I weave this? No, but then, I am on a countermarche...
Compare it to my starting point:

I tried various other even tieups with much the same results, and in the end I decided that there is a good reason the pulleys are called "dräll" pulleys: they are excellent for two-block "opposite" structures! For all the others, there are countermarche looms...

05/07/2016

Busy, but (still) not weaving

What with going up and down to Town (aka Stockholm) a lot, and getting the Glass museum ready for the tourist season, I haven't had much time for textiles.

(but the Glass museum site is now "on par" - ie all pages exist in both Swedish and English - and there is a g**le translate option both on the website and on the blog - feel free to visit!)
(EDIT: I just checked the translation of today's blog post... ACKKK! g**le translate isn't very helpful when it comes to oddities... is there a way I can convince you that it IS intelligible in Swe?!?)

However, this morning I found this:


which shows that that (the not-weaving) is not necessarily a problem...

(a few comments:
- "damastduk"? ok, so it says "paper" in a sort-of-backwards way, but... How will non-textile-y ppl understand what a damask (table)cloth can be, in some years time?

- "damast"? the pattern (not visible in the picture) shows a typical 4-block (possibly only 2-block... didn't open the package) true dräll* - for Swe weavers, damask is a considerably more complex pattern, usually achieved with the help of a drawloom...)

* "about dräll and other patterns"

21/05/2016

All you need to know about counterbalance looms?


As it is continually said that it is "impossible" to weave "unbalanced" sheds on counterbalance looms, I decided to make an illustrated guide to why it is actually perfectly do-able...

So, now there are two new pages on my website - one about how an ordinary Swe style 4-shaft CB loom with horses works, and another one about how dräll pulleys work, and what they can be used for.


30/04/2016

A mystery cloth


This is a top of my mother's:


She made it ages (20? 30?) years ago, from a remnant. Assumed cotton, but who knows, these days? It has a lovely hand.
I have always liked it, and always thought, carelessly, that it must be some kind of crackle-ish structure (although, who would have thought industry would make crackle-ish fabric for yardage?).

So, getting one step nearer:


Hm. Compare front and back ('cos this fabric has distinctly different faces).


Hm. Face side again:


It certainly looks like plain weave, with a pattern of crammed-and-spaced warps... except is does have blocks of some sort?

Hm. Double hm. We can (sort of) see that the warp colours appear to change when the (weft) blocks change.
Or, that's what I think - 'cept I can't understand how, as the whole shebang still looks like plain weave... and the back doesn't really show any weft "blocks"?

The fabric can have been rotated, of course: white warp, coloured weft.
How many colours in the weft, then? (How many wefts can a modern loom handle? And it also has to handle the crammed-and-spaced effect.) And why weave something so complicated, when a multi-coloured warp and constant # of picks per cm would be so much easier? - could it be because this particular mill just had got this very ultra-modern loom, capable of handling a gazillion of wefts and varying the beating-up force - a kind of "because I could"-result?

Against the light (and now all pics start to be blurry... try holding a piece of almost see-through fabric I one hand, while trying to get your camera to focus with the other hand, and you'll see what I mean. First pic to illustrate my point... :-)


And in the last picture it looks like the cramming shifts... regardless of if in the warp or weft direction, HOW??? (click pics to biggify)

Well.

I still think it looks like plain weave, crammed-and-spaced, except it appears impossible to achieve the warp-stripe-colour-changes (that are, I think, essential to the overall colour block idea) with such a simple structure...

The warp colour-"changes" might be some colour-and-weave thing, with the warp being end-by-end... except that to make the "other" colour get to the surface - wouldn't that need a more complex structure?

Insights?

EDIT: for those guessing at some kind of leno - no, I thought about that. Unfortunately the photos aren't sharp 'nuf to blow up more - .

09/04/2016

Announcing:

my new, ok a new, website, of which I happen to be responsible: Bergdala glastekniska museum.

Most pages are still in Swedish only, but some have been translated. The link takes you to the start page in English - for Swedish, click the "på svenska" in the upper part of the navigation column.

As my glass English is not the best (I have been using this page a lot, but what do I know...?!?), I hope you can help me out... all and any thoughts and comments are welcome!

Due to other concentration-consuming activities, I totally forgot about "April spools day" this year.
So, a bit late, a picture to combine spools and glass:


This is a plate used for pantographing a pattern onto several (in our case 24) glasses at the same time, making them ready for acid etching.
(On the off chance: should anybody "out there" recognize the pattern, I would very much like to know "all": name, designer, time, picture(s)...)

30/03/2016

How can I live without floating selvedges?

was a question on a forum last week.

Easily, is the fastest answer. I had been weaving for 20+ years before I even heard about such animals... (and I confess: have not tried FS, not even once, since I heard about them. And, since it is confession time: once in a while I have been known to make an extra turn around the outer end - but I had done that for the 20+ years of weaving before I heard about FS, so I don't know if that counts)

So, how?

Here are some answers:
1. see what happens. IF an end doesn't get caught, ignore it.
2. IF an end doesn't get caught, and it annoys me (probably not, but anyway) - try starting the weft from the other side.
3. think about them before weaving (see below)

The thinking gets easier with written-out structure (binding) diagrams.

Like this: let us assume a 2/2 twill, thus 4 shafts. There are four possible permutations for the tie-up(s). Likewise, there are two possible ways (directions) for threading (/// or \\\). For treadlings there are, again, four possibilities: /// and \\\, but also if we treadle from the top down ("American way") or from the bottom up ("Swedish way").

Here goes: first diagram. The colours in the wefts are put there to distinguish between right-to-left and left-to-right (in reality they are the same colour, as this is a single-shuttle weave)


Going clockwise from upper right: treadling from top to bottom, from right to left (means the red wefts go from right to left): both outer ends get caught. Treadling from bottom to top (means the yellow wefts go from right to left): both outer ends get caught.
However: if one shifts the shuttling direction, both outer ends become un-bound.

Next quadrant (bottom right): exactly the same applies - shuttling from right to left both outer ends get caught. If switching shuttling direction, both outer ends get not-caught.

The two left-hand quadrants work the opposite: if shuttling from right to left, both outer ends get un-caught - reversing the shuttling direction lets the outer ends get caught.
(As I always want to start from the right, I crossed out the two left-hand quadrants)

Diagram 2 - the tie-up is shifted one step up.
As I always want to start from the right, I crossed out the two right-hand quadrants because the outer ends will be un-caught.


Diagram 3 - the tie-up shifted yet one step up.
As I always want to start from the right... the two left-hand quadrants are crossed out.


Diagram 4 - the last permutation in the tie-up.
As I always (etc)... the two right-hand quadrants are crossed out.


Of course, all of the crossed-out quadrants can be fixed by either:
- starting the shuttling from left to right
- OR (still shuttling my fave direction) by adding or subtracting one end each side.


OK, I hear you: BUT what about a more complicated binding (structure)?

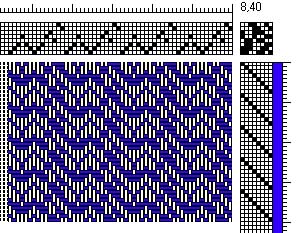
This is a random structure that I found on handweaving.net:


As I always prefer to start from the right, AND (being Swedish) read the treadling from the bottom up: here the turquoise picks go from right to left.
With this threading, tie-up and treadlings there will be some un-caught outer ends. If I haven't made a mistake (or two...) the longest selvedge float will be seven picks.

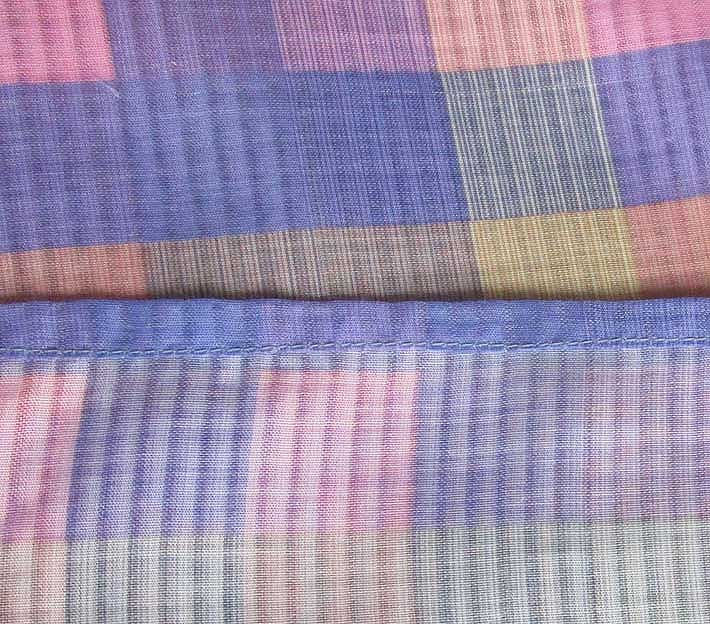
Is seven picks too much?

Well - for a, say, rug (or other coarse weave): yes, definitely.
But for something woven at some 30-40-50 ends/picks per inch? Being metric, I don't much care for "inching", but a free end at the selvedge being 1/2 to 3/4 of a centimetre is nothing much to me.
(It, of course, also depends on the end use of the cloth: if it is to be cut and sewn, the selvedges do not matter at all (coarse cloth or not).)

So, adding to the three "answers" above:
1. see what happens. IF an end doesn't get caught, ignore it.
2. IF an end doesn't get caught, and it annoys me (probably not, but anyway) - try starting the weft from the other side.
3. think about them before weaving (see above)
4. what is the fabric meant to be used for? IF for cutting and sewing, then selvedges usually are of no importance
5. what are the actual lengths of the "free" selvedge threads? Is it likely to catch?
6. (if I am hand-throwing: maybe catch the selvedge "manually" now and again - at the "points" of the top treadling)

This, my friends, is how I live without floating selvedges!

(Re point treadlings, see this post , which mainly is about making a "clean cut" when changing treadling direction.)