I have always loved the Elisabethan oversized collars - like this (from the cover of Arnold: Patterns of fashion, ISBN 0-333-38284-6).
As I also like to weave with horsehair... why not combine them? It ought to look, well, at least "different", with a horsehair fringe hanging to the back...
As these collars are curved, the first problem to overcome was the curving - .
Hmmm. IF the fabric was pleated at the bottom of the collar...
Or - if the fabric was elastic - could it them be persuaded to stay wider at the top? Kind of "built-in" pleats?
OK - I had read several articles about self-pleating fabric. (I had also tried making self-pleating fabric several times - most of them not being successful.) Tried to ask my local friends. Nobody had any idea.
Started to sample.
Several samples later, I had something that worked.
Now, I was concerned that, perhaps, the collar would not stand up to its own weight. What if it just "collapsed" and folded down?
So - I needed a stiffener. And it had to be integrated in the collar, as both sides were to be visible.
As it happens, I know about double weave ;-) - so I constructed a weave with pockets of double weave. But what to put in the pockets? I tried "polyester boning" - too wide, would not be folded double, and too weak if cut in half. Tried some other stiff plastic band thing - no. Then I remembered: a sewing friend had used these:
They are used for tying-together cables and such, can be found at the hardware store. (After nearly 14 ears in the neighborhood, half of the hardware store staff hide when I enter - the other half enjoy my "impossible" requests.)
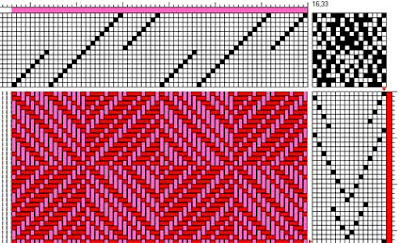
In the sampling, I had found that both the number of picks per stripe ("block"?) and the number of hairs per pick were very important. In this case, I got a nice pleating with 12 picks of 5 hairs each before changing block.
As horsehair does not "turn the corner", I needed to do something to secure the selvages. Two tabby picks after each stripe was the solution. (The double-weave pockets were woven "to size", and the stiffeners were inserted on loom. As usual, I'm using different colours for the two layers, 'cos it is easier to see what's going on.)
I wove about 120 cm for the collar - hoping it would be enough. Every sample that is "smaller than life" is in some way deceptive... percentages sound (are) easy, but the smallest inaccuracy will turn into a big inaccuracy at double the length.
I cut it off, and - nothing much happened. Until I threatened it with the steam iron, that is.
The most succesful sample has got a life of it's own. It has been in a couple of guild exhibitions - once as a fan, once as a vase:
And... should it ever get "tired", a little steam will restore the elastic quality.
27/04/2010
Belt, braces and basting
or: why painstaking pinning proves perfection (im)possible
Sewing velvet is something else...
A small test showed pinning was not enough. Nor was basting.
So, not to lose too much time (and fabric) testing methods, now I first pin the edges, then pin a bit inside, then baste near the edge, and baste again a bit inside the seamline. It works, sort of.
(Second basting not yet done)
And I'm glad I'm only making two of these!
However, I think they are going to look stunning - especially when the golden snakes are in place!
10/04/2010
Cultural differences: "foot-power" loom vs dobby
About 10 years ago, I acquired a computer-controlled dobby loom.
I had been using a multi-shaft loom for many years, so I could not imagine that designing for a dobby loom would be a problem - after all, a dobby was meant to make things easier, right? I had some weaving software I had used for years, and...
The first couple of warps were a piece of cake, as the saying goes. All problems I encountered could easily be called "user errors" - after all, the whole loom was new to me.
So. Time to be a little more adventurous. Something with blocks, perhaps?
I started with something familiar to me - a turned twill. I did realize the "problem" before I started to weave: for the first time in my weaving life I had to decide on the number of picks per block (and write them out, all of them), before weaving... Well - no problem, really: a two-block design, just weave a sample with the assumed number of picks per block, then, perhaps, tweak the charted design.
I have already described one of my first tries to weave summer-and-winter, here). While proving confusing, it was also reassuring: now I understood both about s&w AND how to handle dobby designs, right?
Right.
Next idea: now I could easily plan a whole long piece, borders and patterns and total length and... AND the sofa needed a cover...
Starting the sampling was easy. I had a fair idea about sett and such - it was "just" the actual pick count to determine, and to convert that number into actual length (it had to fit the sofa), and to make the design AND the pick count AND the desired length to converge... Mere calculus, should be another piece of the proverbial cake, right?
Right.
It turned out that I wanted 6 pattern picks per each 4 pattern warp ends. This was not the standard number that the weaving software offered. As I thought ("knew") that I knew the ins and outs of the software, I "knew" that I had to fix that pick count manually... That was fun (NOT!). (Now I know better - nothing like starting to design for a dobby to make you understand about the "hidden" finesses in your weaving software! Mine has several...)
Well. The sofa cover came out OK - it fit the sofa, the mistakes are not too obvious, it still serves its purpose. AND it was (reasonably) easy to weave, compared to... for instance this:
The real nightmare when using a dobby (compared to a "foot"-loom) is when something goes wrong. OK, it sounds easy enough: reverse the direction, and unweave "until done". Reverse direction again, and resume weaving. It is amazing, how easy it is to lose control when reversing...
Well. I think I'll leave it there.
The blue-and-white fabric made a jacket, mistakes and all:
06/04/2010
Pure imagination?
Today I've started on the next batch of gowns - this time using a nice 38 mm ("heavy") silk crêpe.
I have used this fabric before, and have had the same experience before, too. Or - is it just something I am imagining?
One of the pieces looks approximately like this:
After cutting, I serge all the sides.
After serging, I sew the pieces together - and... I think the serging direction is of importance. Or am I just imagining things?
The warp direction is marked in blue. It is the same in all pieces.
There are two possible ways to do the serging - either from to top bottom (green), or from bottom to top (red).
I think that serging from bottom to top (red) stretches the bias, so it becomes longer than if I do the serging from top to bottom (green). The bias angle remains the same...
Or - am I just imagining things?
The difference is not bigger than it could be from the inaccuracies in the cutting... or?
Opinions?
05/04/2010
Cultural differences: from the outside looking in
Late in 1998 (the 13th of December, in fact) I was approached by what was to become Växjö university. At the 1st of January 1999 they were to achieve university status, and they were to have the big inauguration at the beginning of February. They had decided that they wanted their very own academic dress for their professors. Was I interested in making them? I was.
So I went to town, to see their prototype. For various reasons, it was not useable as a model. So... was I interested in giving them a proposal? I was.
But.
What did I know about academic dress? Well - nothing at all. I knew that most Swedish universities did not use specific academic dress, apart from doctor's hats. I knew that there were "gowns" used in the UK, but had no idea what they looked like - except there was a lot of fabric, and weren't they black? Google? Yes (or was it Yahoo then?) - but there wasn't very much Out There 10 years ago. Library? Yes - but what to ask for? People? Yes - but where to find them? And it had to be done in six weeks...
I borrowed all books I could think of, I went to the cathedral to look at their wardrobe, I 'phoned several universtities, I found a couple of Brits. And I also had to take into consideration what the Växjö people wanted.
I came up with an idea, with no historical roots at all:
After some minor tweakings, the model was accepted, I found enough fabric (where do you buy 80 meters of fabric, any fabric, and have it delivered between christmas and new year?), made the gowns.
Several months later, I found a Yahoo list about academic dress. After a while, I dared participate on the list... The poor list members - they must have thought they had got an idiot (or at least a complete ignoramous who could barely read) among them. I had to learn a new vocabulary ("undress", anyone?), a new way of looking at pictures (the difference between a Burgon-style hood and a full-shaped one)...
In the year 2000, the Burgon Society was founded, and a year or two later I dared to join.
Now I am a fellow of the Society (and proud of it - thank you for having me!), have read a lot of literature about academic dress and its history. I know a lot more about the history and usage of distinctive dress for academics and clergy in Sweden, and I have designed gowns for a couple more universities in Sweden.
But.
Whenever I visit the Burgon Society's gatherings, I still feel an oaf... I recognise the words (well, many of them), but I'm not quite sure what they mean. I know a simple hood when I see one, but am unsure of how to distinguish a full hood from an Aberdeen style one...
I wonder which is the most interesting perspective: to be inside a culture, looking out, or the other way around? What I know is that there is a lot of head-shaking going on, whichever perspective you have...
Examples from Sweden (old and new), Portugal and England.
01/04/2010
Cultural differences and weaving
Then we have the weave structures (or "bindings" as Burnham calls them, more in accordance with the Swedish usage). For instance, I don't understand what a "double weave tie-up" means - especially when it means a "universal" tieup, one that would produce two layers of plain weave, if (and only if) the threading was done to an odd-even principle. The idea of using "double weave tie-up" with a complex threading, getting a cloth with very few areas of double layers - and calling the result "double weave"... I just don't get it. If it has two layers, it is a double weave. If it has not, then it is not, right?
Or... "a twill threading"? Combined with a "huck tie-up"? "Treadled as ..."? Sometimes I can decode the message: a "twill threading" often is what I call a "straight threading". But a "huck tie-up"? Huck is (to me, that is) a structure (of the resultant fabric) - so, a "huck tie-up" is a tie-up that will, in combination with a threading and a treadling, give me a huck fabric.
I once wove this 2-block diamond twill to see how such a pattern would react to "vadmalizing" - would the pattern still be visible, or would patterning the cloth to be fulled be meaningless? (left side loom-state, right side after "stamping")
I wanted the threading to be as easy as possible, and the treadling, too. The draft became:
Personally, I don't like "walking the treadles". However - if I had wanted to, the draft would have looked like this:
Had the yarn been very hairy, or the sett extremely close, I might have changed the threading:
More complicated to thread, but (according to some books, at least!) the spreading of the shafts to be lifted at the same time would help the forming of the shed.
The point is: the fabric is a 2-block diamond twill. The same 2-block diamond twill, even though the threading and/or tie-up and/or treadling are different. So... "a twill threading"? Or "a 2-block tie-up"?
Just for fun, I combined the above possibilities, to see what happened...
The two threadings, the two treadlings,and the two re-arranged tie-ups:
And, whatever they are, 3 out of 4 combinations can't be called 2-block diamond twill...
Labels:
block weave,
cultural differences,
twill,
weave construction
Subscribe to:
Posts (Atom)